3 to 10 Day Henna Glitter: Two Safe Methods for U.S. Pros
- angana0403
- 7 days ago
- 7 min read
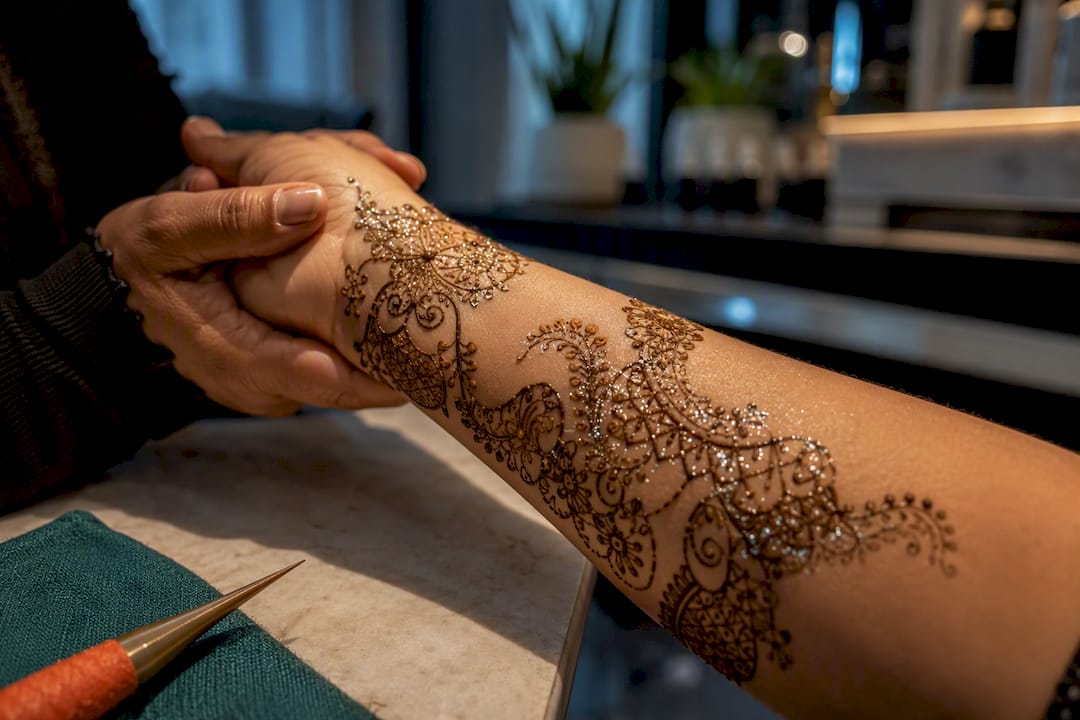
Cosmetic-grade polyester glitter applied over a body-safe gilding paste is the method that lasts and stays safe on skin. Skip craft glitter, skip mixing sparkle into wet henna paste, and always run a 24-hour patch test before your event. Practitioners like Henna For Fun teach exactly this approach in private lessons and kits.
TL;DR:
Professional gilding pastes provide waterproof, multi-day durability, while DIY gels typically wash off within 24 hours.
Patch testing adhesive and glitter a day before application helps identify skin sensitivities, especially for sensitive or eczema-prone individuals.
Applying glitter over fully dried henna with a fine brush and long-wear adhesive yields designs that last 3 to 10 days, depending on activity.
Only purchase glitter labeled as “cosmetic,” “body-safe,” or “skin-safe,” avoiding cheap craft glitter or products marketed for crafts and nails.
Table of Contents
What Makes Glitter Body-Safe for Henna Art
The difference between a gorgeous glitter mehndi design and a skin irritation starts with one word on the packaging: cosmetic-grade. Craft glitter, the kind sold for scrapbooking and school projects, is often metallic foil or PET plastic with jagged, irregular edges. Under a microscope those edges look like tiny shards of glass. Cosmetic-grade glitter is different: it is manufactured as fine, uniform polyester particles, typically sized around .008 inches, with rounded edges designed to sit on skin without scratching it.
If you’re evaluating a product, check for these red flags before it touches anyone’s skin:
No mention of “cosmetic,” “body-safe,” or “polyester” on the label
Visible foil flecks or shapes larger than a grain of sand
No ingredient list or safety information at all
Marketed primarily for crafts, nails, or home decor
Run a small patch test 24 hours before full application, dabbing a bit of adhesive and glitter on the inner wrist or elbow. If redness, itching, or bumps show up, don’t proceed. If glitter or adhesive does get into an eye or open cut, rinse thoroughly with water and stop use.
Choosing the Right Adhesive: Gilding Paste vs. DIY Bases
Your adhesive choice decides how long the glitter survives contact with skin, sweat, and water, and it matters more than the glitter itself.
Professional gilding pastes, including Becoming Moonlight-style formulas and Pros-Aide, are medical-grade adhesives built to bond fine particles to skin for days. They dry tacky, hold glitter through showers and light exercise, and are the standard choice among henna artists who want a design to survive a wedding weekend or festival circuit. The tradeoff is cost and the extra step of sourcing a specialty product.
DIY bases like thick, non-runny hair gel or aloe vera gel work for shorter-lived looks. They’re cheap, easy to find, and gentle enough for kids’ events, but they wash off with the first shower and won’t hold up to sweat or swimming.
Gilding paste / Pros-Aide: waterproof, 3 to 10 days of wear, higher cost
Hair gel or aloe: budget-friendly, one day or less, not shower-proof
Pre-mixed glitter gels: convenient, washable, best for same-day events
Anyone with sensitive or eczema-prone skin should patch test the adhesive itself, not just the glitter. Adhesive reactions are more common than glitter reactions.
Pro Tip: Keep a small tin of plain aloe gel on hand at events. If someone reacts to a professional adhesive mid-appointment, aloe removes residue gently without irritating already-sensitive skin.
How to Apply Glitter to Henna: Two Methods That Work
Method A: Adhesive-backed glitter (professional, long-wear)
Let the henna paste dry and fully set on skin before adding any glitter.
Using a fine brush or applicator, trace thin lines of gilding paste over the parts of the design you want to highlight, not the entire pattern.
While the adhesive is still tacky, press cosmetic-grade glitter onto the lines using a soft brush or by gently pouring it over the area.
Tap off excess glitter over a paper towel so it can be reused or discarded cleanly.
Let the adhesive cure fully, usually 15 to 20 minutes, before touching or covering the area.
Method B: Glitter-gel mix (DIY, short-lived)
Mix cosmetic-grade glitter into thick hair gel starting at a 1:8 to 1:10 glitter-to-gel ratio, adjusting until the mix flows but still holds sparkle density.
Load the mix into a precision poof bottle or a hand-rolled cone.
Test the flow on a paper towel first to check for clogs or uneven output.
Apply directly over or alongside your henna lines in short, controlled strokes.
Tools worth having on hand: handmade henna cones or carrot bags for control, soft brushes for pressing glitter, cotton swabs for cleanup, and gloves if you’re applying to multiple people in one sitting.
Two things go wrong most often. Cone tips clog when glitter particles are too coarse or the gel is too thick, so thin the mix slightly rather than forcing it through. And heavy, single-layer glitter application tends to blur fine henna lines once it dries. Thin adhesive lines with smaller color placements hold detail far better than one thick pass.
Aftercare: Making the Sparkle (and the Stain) Last
Aftercare depends entirely on which method you used. Adhesive-backed glitter can handle a normal shower once it’s fully cured, though soaking or scrubbing the area shortens its life. Glitter-gel mixes are more fragile and typically don’t survive a single wash.
Realistic wear expectations:
Gilding paste over henna: 3 to 10 days, depending on placement and activity
Hair gel glitter mix: same day to about 24 hours
Hands and feet: shorter wear due to friction and washing
Upper arms, shoulders, collarbone: longer wear, less abrasion
To remove adhesive-backed glitter early, press tape gently over the area and lift, repeating until clean. For gel-based glitter, a light coat of oil followed by a warm wash breaks down the gel without scrubbing the henna stain underneath.
Where to Buy Cosmetic-Grade Glitter and Adhesive in the U.S.
Not every glitter sold online is meant for skin, and packaging doesn’t always make that obvious. Before buying, check the label for three things: the word “cosmetic,” a particle size around .008, and either “skin-safe” or “body-art” phrasing. A full ingredient list is a good sign; a bare “glitter” listing with no material description is not.
Reliable sourcing channels include specialized henna and body-art suppliers, dedicated cosmetic glitter vendors, and marketplaces where sellers clearly label products for body art rather than crafts. Avoid anything marketed primarily for nails, scrapbooking, or holiday decor, since those glitters are frequently metallic foil rather than the rounded polyester particles that are actually rated for skin.
Shopping red flags to walk away from:
Product photos showing chunky, uneven flecks
No particle size or material listed anywhere
Zero mention of patch testing or safety guidance
Prices dramatically lower than comparable cosmetic-grade listings, often a sign of craft-grade material relabeled for resale
Why Glitter Type Changes the Whole Look
Not all sparkle reads the same on skin, and the type you choose changes both how long it lasts and how it photographs. Ultra-fine polyester glitter, the standard cosmetic-grade option, catches light in a soft, even shimmer that sits well inside delicate henna linework without overwhelming it. Because the particles are small and uniform, they follow curves and fine details closely, which is why it avoids the visibility problems chunkier glitter creates in fine lines.
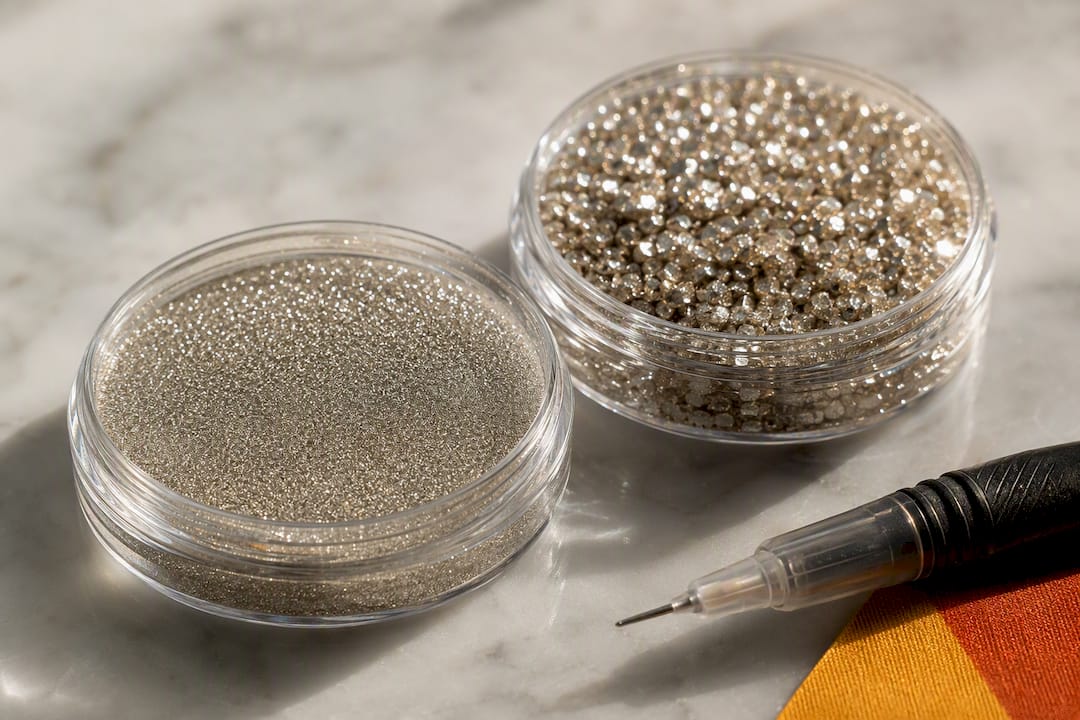
Chunkier metallic or foil-based glitters, even when marketed loosely as body-safe, tend to sit more visibly on top of the skin. They photograph with a bolder, almost sequin-like sparkle, but that same bulk makes them more prone to flaking and less comfortable against skin for multi-day wear. They also tend to shed faster, since larger particles have less adhesive surface contact per piece.
Color depth matters too. Iridescent or holographic cosmetic glitters shift color under different lighting, which works beautifully for evening events and photos but can look muted in flat daylight. Straight metallic gold or silver polyester glitter reads consistently in any light, which is part of why it remains the most requested option for weddings and daytime festivals alike.

For durability, particle uniformity beats particle size. A glitter with mixed sizes in the same batch wears unevenly, with larger flecks falling off first and leaving a patchy look days before the smaller particles do.
Practitioner Notes From Henna For Fun’s Events and Lessons
Working glitter into henna at live events teaches you fast what actually holds up. Speed and hygiene both matter when you’re doing back-to-back designs, so a quick-dry thin adhesive line paired with a small poof bottle of glitter keeps the line moving without sacrificing the finished look.
The most common question clients ask isn’t about color, it’s about skin sensitivity, especially at kid-friendly events where a gentler hair-gel base is often the smarter call than a professional adhesive. Sensitivities show up more with adhesives than with the glitter itself, which is part of why patch testing gets emphasized in every private lesson. Readers who want to build this skill hands-on can also look into Whenna Events or the DIY cones and stencils sold for home practice.
— Angana
Learn Safe Glitter Application With Guided Practice
Reading about technique only gets you so far. The fastest way to stop guessing at glitter-to-gel ratios or adhesive timing is to practice alongside someone who does this for a living, which is exactly what Hennaforfun’s private lessons in Kirkland, Bellevue, and Snohomish are built for.

A private session walks you through both methods covered here: adhesive-backed glitter for long-wear designs and gel-based glitter for quick, washable looks, using cosmetic-grade supplies the whole time. If you’d rather host a group, Whenna Events brings the same guided approach to birthdays, showers, and get-togethers. And if you’re expecting, the pregnancy henna service adds glitter accents to bump designs for photos that hold up in every shot. For those who want to practice solo first, the handmade henna cones are a solid starting tool. Book a private lesson to get hands-on guidance before your next event.
Sources
For deeper technique and safety detail, see The Henna Page’s gilding and glitter guide and Henna King’s cosmetic glitter listing.
Recommended
Comments